Monday, December 10, 2012

Project 5: Final Project due Friday, 12-14-2012


Description of Assignment:
For this project, we were to create a short animation, lasting 15-30 seconds focusing on; character animation, facial animation, or dynamics. We could use any of our previous models, the ones on the class website, or create our own.

Concept:
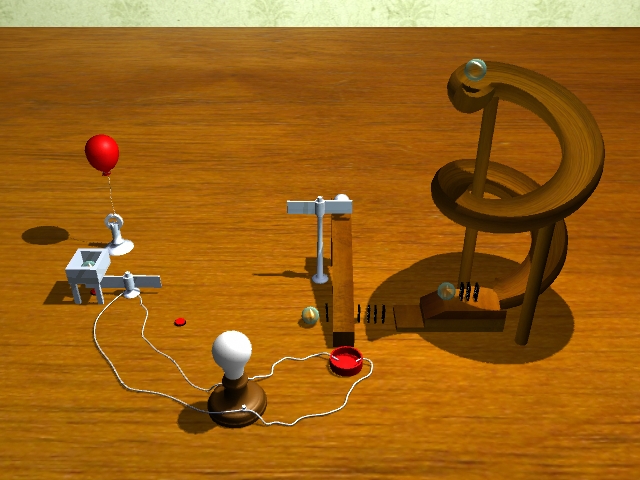
I chose to create an animation focusing on dynamics. I created a  Rube Goldberg contraption, a machine that performs a simple task in an overcomplicated manner. My machine used marbles, dominoes, slides, spinners, and buttons to turn on a lightbulb and release a balloon.

My Process:
Once I had created my domino and marble models I began constructing my structure and creating passive ridged bodies to interact with the dominoes and marbles. I first tried applying active ridged bodies and a gravity field to all the items but this proved too much for the computer to calculate and for me to troubleshoot. So I applied active ridged bodies to a few items at a time, backed the simulations onto the items, deleted their ridged bodies, turned the last item into a passive ridged body and repeated the process until all the items had and animation.

Playblast of Initial Design


With a base animation set-up I then began updating the structures to give the contraption more weight and believability. I added the light bulb to the machine and constructed different shaders for the objects and the setting. While lighting the scene I worked at adding shadows and camera movements to make the movie more dramatic and fun. I also added some extra dynamic effects like the lighting affect to simulate a spark. In an attempt to increase the complexity of my machine I also added a balloon using a gravity field of -9.8m/s2 to create a floating affect.

Rendered animation


link to animation:

Download Maya:
https://www.dropbox.com/s/cq8hsmaz8t701mi/JarrellMarie_Project5.ma


links to wall and floor textures:
https://www.dropbox.com/s/eby80ajb751c2yp/Wallpaper.jpg
https://www.dropbox.com/s/3f4h5qdc41541nk/WoodTexture.jpg

Wednesday, November 28, 2012

Bowling Ball and Pins

Using Dynamics we were to simulate a bowling ball hitting some pins.

Sunday, November 18, 2012

Project 4: Skinning and Animation with Motion Capture Data due Monday, 11-19-2012

Description of Assignment:
For this project we used motion capture data to animate a character. We combined at least three motions. Once the motions look good on the character, use the resulting clip as a basis for our animation, we were to then create a movie to show our results.

Concept:
Due to some hiccups in the beginning of this project my animation was all about getting down the basics as best I could in the limited amount of time I had to work.

My Process:
I began by importing each motion file and constraining it to a skeleton. Then, I created clips for each motion and exported them so I could use them all on one figure. I then found three clips, the standing idle clip, the jog forward clip, and the jog left clip, which hooked-up together with the littlest amount of manipulation and created a new clip using all three clips. I then used Activate Keys to transfer the frames of the clips onto the timeline.
 
Clips


Unfortunately, my original clip of idle-jog-turn left proved unusable when bound to the model so I created a new clip using the idle-jog forward-and jumping clips to create a new animation.

 Skeleton Run and Jump


With my skeleton and basic animation I then imported my model and began binding the model to the skeleton. I used a smooth bind and tried to connect the joints to the areas of the model they corresponded with as accurately as possible. Once I created the bind I tested out the animation to see what areas were working well and what areas needed polishing. 

Figure


Initial binding


In order to make the model move without any bizarre transformations I used paint weights. This way each area would stick to its joint and areas that shouldn't move with the joints didn't. This helped for some areas like the armpits and chest, but other problems had to be fixed using other techniques. For one of the legs and another arm I had to actually go into each frame and move the joint into place so that no deformities were present. With these techniques I was able to create a basic animation and managed to include a simple setting.

Painting Weights


Rendered animation


Download Maya:
https://www.dropbox.com/s/xqz4lvk4ybfvag5/MarieJarrell_Project4.ma 

Sunday, November 4, 2012

Blockman Step

 Here is a couple of steps of a walk cycle.


Friday, November 2, 2012

Project 3: Shading, Lighting, Texturing, Rendering, and Animation due Monday, 11-05-2012


Description of Assignment:
For this assignment, we were supposed to create an animation lasting 10-20 seconds that shows
an object following a path. Using a A motor scooter or unicycle to animate we were to create a final movie comprised of rendered frames. The scene needed to have must contain at least three different shaders or textures, adequate lighting, and try to incorporate as many of the Disney 12 animation principles as possible.


Concept:
I wanted my animation to tell a story, for it to have a clear beginning, middle, and end, and for my unicycle to have a certain amount of humanity. So I came up with the idea that my animation would be about a unicycle struggling to achieve something, initially failing, and then succeeding, but going a bit too far and getting hurt. 

My Process:
I began by creating groupings for various levels of animation, the path the scooter would follow, the swaying of the scooter as it moved, the rotations of the wheels etc. Here are some playblasts of the scooter after each animation was added.


PATH ANIMATION:


SWAYING ANIMATION: 


WHEEL ROTATION ANIMATION:


SEAT SQUASH AND STRETCH ANIMATION:


LATTICE ANIMATION:


SEAT SWAY ANIMATION: 


Animation Principles:

Squash and Stretch:
There are several obvious examples during the unicyicles initial failed attemps and during the end of its success. But the head and neck of the unicycle are constantly making small squashes and stretches throughout the animation.

Anticipation:
The unicycle will constantly pull back from the direction it intends to run off to before moving forward. During its first try it makes several back and forth motions to make it appear as though it was building up momentum.

Straight ahead action and pose to pose: 
My project utilized pose to pose animation, I mapped out the key places and orientations I knew the unicycle had to be in and then made minor corrections to clean up the in-between action. For example, to animate the super fast pull back and final leap I first put key frames at the beginning and end of the action, then in order to make sure the seat head was quickly snapping down due to the force of the motion I added an in-between frame.

Follow through and overlapping:
The head and wheel of the unicycle will arrive at areas at different times; see the initial swings back and forth as an example.

Slow in and Slow out: 
When the unicycle makes it's initial forward and backward movements it will slowly fall forward at the beginning of its movement and then slowly recover at the end.

Arcs:
There is a big one during the final jump, but whenever the unicycle moves forward or backward it dips down and comes back up in an arc.

Secondary action:
There are several smaller actions that occur as the unicycle moves beyond the structure going back and forth, the petals and wheel rotate, the neck moves up and down, the seat swings back-n-forth, all these actions combine to create the illusion of movement grounded in physics. 

Timing:
In order to make certain actions appear to take more or less time to occur a shorter or longer amount of frames were spaced between actions. When the unicycle appears to move very fast there are only a few frames (2-5) used with it moving a great distance inbetween. To make the unicycle appear to fly across in slow motion it was moved only a few places over a great number of frames (10-20).
 
Exaggeration:
Seen anytime the unicycle behaves in a way a true unicycle would not, the way the seat moves during a it's passes, the stretching of the neck, the fact that the unicycle smashes into the wall instead of bouncing off of it.
 
Appeal:  
I made my unicycle red because I thought it was a more engaging color and because most people equate red and red objects with speed.

Rendered Video:


Download:
https://www.dropbox.com/s/sof7i5y4f9pyjke/Final%20Render.mov

Hierarchy:


Download Maya:
https://sites.google.com/site/jarrellfiles/JarrellMarie_Project3-Unicycle.mb.zip?attredirects=0&d=1

Friday, October 26, 2012

Pixar Model Render


For my first solo render I decided to take my model of Heimlich and breath some life into him. The hands feet and dots on his back use a simple Blinn red texture. The body is a Lambert texture with a Ramp shader. The antenna like the hands and feet are a Blinn texture but also use a Ramp shader to transition from green to red. The eyes use a Phong texture and a Ramp shader.

To light the scene I used 3 spotlights; one pointing 45˚ down and 45˚over from the right, one pointing 45˚ down and 45˚over from the left, and one pointing 60˚ down from the very back of the figure. This is a standard lighting scene used in stage lighting.

To create the background I found and image of a leaf with a fly resting on it online. Using Photoshop I removed the fly and adjusted the image resolution to avoid pixilation. I then created a Polygonal plane and imported the image into the plane's texture. I adjusted the plane so that it would appear as though Heimlich were resting on the leaf and created several renders of the image. Choosing my favorite picture I did some final touch-ups in Photoshop and this was the end result.

Thursday, October 18, 2012

Axe Model


Here are snapshots of the Maya display and several quick renderings of my axe.